Friday, December 3, 2010

I will try to do better

I am SO sorry it has been so long since I posted.  I had it brought home to me the other day with a phone call that some of my online friends have been worried about me.  Just want to tell you all that I am still here and doing relatively well.  I've been fighting severe depression for about 6 months now.  Have been on medication for it and feel much better.  Question though....when you are depressed and then start taking an anti-depressant and then (several months later) you no longer feel depressed, is it the medication working or are you no longer depressed?  Catch 22 here.  Doc won't let me go off the anti-depressant just now because we are coming up on Winter here and many people here are affected by Seasonal Affective Disorder, so she wants to head that off with me this year.....wonder what reason she will come up with to keep me on it come Spring...lol
Anyways, I haven't really been doing a lot of cardmaking (although you wouldn't know it from the cards I'm gonna show you...lol)  Have been doing a LOT of designing lately though.  The cards I DID make are all of my Christmas cards for this year.  I didn't have a single card to start the Season out with, so had to start out from scratch this year.   These cards are all my own designs, so if you are interested in any of them, be sure to check them out at www.craftsuprint.com/carollepard.

As well as that, I got shanghied into doing another Craft Show tomorrow, after I said I wasn't going to do anymore until the economy got better.  So, I had to make up 20 Christmas cards for that too, as well as the Bevy of Angels.  I will have a total of 30 of these lovelies at the show, so hope others like them as well as I do!  Thanks to Carol from Fred She Said for the wonderful tutorial for these angels!
On that note, I will close with wishes for a Wonderful Christmas and a Blessed New Year and will really try to post more often!

Friday, October 8, 2010

Whoot! I'm on YouTube!

Yeup, I'm on YouTube!  I've done a CUP TV episode, showing how to make my Double Flip Flop Cards.  How cool is that?  Never thought I would do one of those things but it was an absolute blast to make!  Can you see how nervous I was making it?  I have horrible "stage fright" but wanted to join in on the fun of making one of these videos showcasing one of my cards.  I hope you all enjoy the video and leave me some feedback on how I can imrpove for the next one. :-p

Tuesday, September 28, 2010

Long time no see!

Well, it has been a long time since I posted, but I'm still here!  I've been off on a trip to NY State to visit a friend for a week...and OH what a GREAT time we had!  Been having some health issues since I got back, but hopefully soon they will be over!  Not done much in the way of design work, but I got an order for a card with a Truck, so instantly thought of the Truck from Fred She Said!  I just LOVE this image!
I printed the image out on some textured and speckled paper by Wasau called Stardust then cut it out with the Mega Curved Rectangle Nestabilities and soften the edge with Color Box Platinum ink.  I layered it on one of my Walnut Inked Backing Paper 1, which I embossed with the Cuddlebug Script Embossing Folder then rubbed with metallic chalk and softened the edge with several brown inks from Color Box.  This is then layered onto the card which is backed with a piece of crinkled and sanded Core'dinations Color Core Cardstock.  All in all, a great card to give to an elderly gentleman.
Hopefully soon I will have the pictures from my trip edited (I took over 200 :-O ) and will be able to post some about it.

Tuesday, August 17, 2010

Double Flip Flops made up

I've made up a couple of my new Double Flip Flop cards for those of you who want to see what they look like made up first.  There is also a Tutorial for making the cards up.
Bright 'n Girly
The first one is the Bright 'n Girly 5 x 5 Double Flip Flop card.  I made this card by printing it out on very textured cardstock, cutting out all the elements and assembling according to the directions using thin foam tape.

Rose Garden
This second card is the Rose Garden and is made by printing out on very heavy textured cardstock, cutting out and assembling according to the directions with thin foam tape.

Friday, August 13, 2010

My New Concept card is now Live!

Well, I am done designing and posting my new card design on CraftsuPrint.  This is my own card design and I hope you all enjoy making them up!  To make it easier for you to find them, I'm going to post all of them here with links to the kits.  Let me know what you think or if you have any special requests.

Birthday Boy Word Search

Birthday Girl Word Search

Bright Birthday

Bright 'n Girly

Christmas Bear

Christmas Is...

Christmas Snowmen

Christmas Tidings


Decorating for Christmas

Four Seasons

Love Owls

New Baby Boy

New Baby Girl

Purple Floral

Red, White & Blue Roses

Rose Garden

Summer Fun

Wedding Roses and Swans

Hope you all like these as much as I had fun designing and making them up!  Full instructions are included for making up the cards with each kit.

Friday, July 30, 2010

Another Digitally Painted Rose

Oh!  I am having SO much fun painting again!  Even if it IS done on the computer!  A whole lot less mess that way too!  And much easier to correct mistakes made...lol
Here is my latest Digitally Painted Rose.
Inocent Love Rosebud
And the Digi-Stamp if any of you would like to try YOUR hand at painting your own version of the rose.
Rose Bud Digi-Stamp
Keep your eyes out for more of this kind of thing as I am really having fun getting back into the really artistic part of design!

Thursday, July 22, 2010

Some of my Newest Designs on CUP

Well, since I'm not making cards at the moment, I thought I'd share some of what I AM doing. I have been really "going to town" with the Digital Drawing and Painting! Here are several of the new sets that I have done that are available on CUP (Craftsuprint)

http://craftsuprint.com/default.cfm?bigpic&id=106534
http://craftsuprint.com/default.cfm?bigpic&id=106536
http://craftsuprint.com/default.cfm?bigpic&id=107464

All of my work can be found Here

I am having Lots of fun making these and will be doing more soon.  For those interested, I am using a Wacom Bamboo Drawing Pad and Photoshop Elements 5.0 to do all of my work with.

Thursday, July 15, 2010

Life Has a Bad Habit

Sorry it has been so long since my last post.  For more of the story why, see this post:
I am also taking a break from working as a Design Team Member for Fred She Said, but will be back to that soon, I hope.  As soon as I can find my Card Making Mojo again.  I really haven't made very many  new cards recently.  I have however done quite a bit of new designing for anyone interested in making their own cards.  Please check out my designs here.  Here are a few of the cards I have made up over the last couple months using some of my own designs.


Mostly trying to get ready for Christmas, as I used up all of my stock of Christmas cards last year.  So the only cards I will get to send out this year are those that I get made.  Pretty sad really when you consider that I don't have any desire at all to actually sit down and MAKE cards right now!
I am in the midst of one of the largest design projects (for me at any rate) that I have ever done...including all of the CD's that I have put together. :-O  I came up with a New card concept and am currently working on the needed designs before I can go "live" with it over on CraftsUPrint.  I will post my finished card here as soon as the design goes "live" so you can all go check it out. ;-)
Well, hopefully this post means that I will be getting back to posting more regularly, even if I don't have any cards to share with you all.  I can't promise not to be a stranger again, but I can promise to try. ;-)

Thursday, May 27, 2010

Busy week!

Wow!  Last week was busy!  I had my bestest friend come and stay with me for a whole week!  She came in from Upstate New York and we had a total blast!  I actually got a few cards made too. :-O  We had fun showing each other new things/card techniqes.  Here is one of the cards I made.
This Fred She Said image is Emma Blowing Her Bubbles Digi Stamp. I've colored Emma with Prismacolor color Pencils, then used Baby Oil in my version of the Gamsol Technique to blend them.  I used Clear Finger Nail Polish over the Bubbles so they would "pop" (who needs expensive Scrpapbooking products!  ;-)).  Then I cut Emma out with the Nestabilities Labels 1 die, sponged the edges lightly with reconstituted Walnut Ink Crystals and then distressed the edges.  Emma is then layered on two pieces of Card Stock that have been cut with my new Martha Stewart Punch Around the Page punch.  Added a bit of ribbon and a bow, a peel-off sentiment and it finished, ready to send out.

Friday, May 21, 2010

Here Comes Summer! Blog Hop

Welcome to our "Here Comes Summer FRED SHE SAID" blog hop!!! If you just happened to drop by my blog and you are not aware of this wonderful event taking place, please go back to the Fred She Said blog and start your hop!

Please, we would love it if you commented on our posts.

Along the way, you will see a special CODE WORD. Collect them all up! Once you reach the end of the blog hop (which will be the Fred She Said Challenge blog), follow the instructions to make your entry and your name will go in for a draw for a $20 Gift Certificate for the Fred She Said Store!

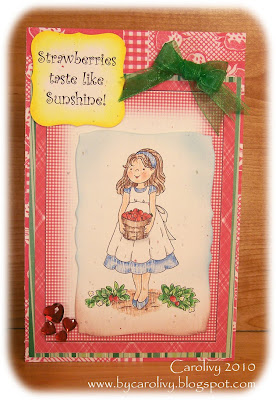
Here is my Fred She Said creation:
I used Emma in the Strawberry Patch by Fred She Said and colored her with Prismacolor Colored Pencils and cut out with the Nestabilities Mega Curved Rectangle Die.  The Red Gingham paper is one of my card fronts available on CraftsUPrint here and the Strawberry paper is some scrapbook paper from my stash.  I added a Computer Generated Sentiment that was cut out with the Nestabilities Labels 1 die and then inked around the edge.  Some cute Heart Gems and a Double Organdy Bow finish off my card for this hop.

My special code word is:  SEASON

Here is a list of the blog hoppers in case you lose your way:

*FRED SHE SAID blog 

*SONYA

*MARIA

*SHELLEY 

*MICHELLE 

*CAROL L. (You are here)

*DARSIE B. 

*JUDY 

*CAROL H. 

*LORA 

*DEANNE

*FRED SHE SAID CHALLENGE BLOG

This blog hop will run from today, MAY 21st until MAY 27. On the 28th, the winner will be announced on the Fred She Said blog.

Thank-you for taking the time to play along. Now, to continue the blog hop, please visit DARSIE B.
When you are finished hopping, why not check out the Fred She Said Store!

Wednesday, May 12, 2010

Busy, Busy, Busy around here!

Well, it has sure been busy around my house the last couple days!  I am having some work done on my house and they are working like gang busters!  I can't believe how fast the work is going!  I am having a roof put over most of my front deck (mostly to stop some water that is going into my basement, but I will LOVE the extra shade!)  They are also going to be doing some other stuff to stop the leaking too, but this is the first step.  Here are pictures of the work in progress so far.


I've been real busy myself, getting ready for a friend who is going to be visiting me next week for a whole week.  We are going to have SO much fun when she gets here!  We have a Craft Show that we will be doing together and then on another day we are going to do some SERIOUS retail therapy at Hobby Lobby, Joann's and the Bead Haven!  I've been making up a bunch of cards too, getting ready for the show.
Here is one that I made up using Fred She Said's Emma in Her Frills for a lovely lady going through a terrible time right now.  Her husband was in a terrible motorcycle accident.  My prayers and wishes for a full recovery went out in the mail with this card.

I used Prismacolor Color Pencils to colro this one and then dry blended most of it.  I cut Emma out with the Nestabilities Labels 4 die, then inked the edges while it was still in the die.  The paper behind Emma is cut with the same die and is actually a piece of white embossed paper that I completely rubbed over with ink.  Th edge of the green card has been punched with a Martha Stewart Edge Punch and layered on the card blank which has been cut on the edge with a Deckle Blade and then inked with 2 shades of purple.  I then used Aleene's Tack-it Over & Over inside the cutouts and added glitter.  The sentiment is done the same way with the inks.  A beautiful organdy bow, peel-off corners and lots of bling finish of this card.

Tuesday, May 4, 2010

Man's Birthday Card with Rosey

I have an order for several Birthday Cards and when the lady told me that one of the Guy's she needed a card for, I immediately thought of Rosey by Fred She Said!  Rosey comes Pre-colored, so all I did was cut her out with the Nestabilities Labels 3 die and layer her on a very large paint sample that I rounded the corners on and a piece of DP that I rounded the corners on and then punched each end with the Martha Stewart edging punch.  All layered on top of a "leather" look piece of scrapbook paper and finished off with some gold peel-offs.  (Hope she likes it as "Men's" cards are SO hard for me to think of!....next ones I have to figure out are for a Blind Man and a Blind Woman! :-O  Watch out for the TEXTURE on those!  lol)

Monday, April 26, 2010

Y'all Ready for Another Challenge?

Yup, it is that time of month again at Fred She Said!
This month's Challenge is to Make Something 3-D for a Loved One. Just remember though, that you MUST use a Fred She Said image Somewhere on the card for it it qualify in the Challenge! If you don't have one, not to worry! There are PLENTY of Freebies here! Come and Play with us for the chance to win a $20 Gift Certificate at the Fred She Said Store!  Enter your project on Mr. Linkey in this month's Challenge post on the Fred She Said Challenge Blog.  Don't have a Blog?  Not to worry.  You can still entere!  Follow the directions for emailing a picture of your entry to Tracey.


Now, on to my project for today!

I have chosen to use an old Crayola Box and do a bit of Alteration to it.  I have used paper from a "petite fleurs" patterned paper that Tracey designed and it can be found here as a FREEBIE.  It took me 5 sheets to fully cover the box.  I then took a 5 x 7" Photo Mat and covered it with Gold Vellum and mounted it on the box lid with foam tape.  Then came the flowers from the Lovely Blossom & Butterfly Coloured Decoupage Kit (I used the blue set to follow the Blue Theme I have going here)  I cut the main image out with the Mega Curved Rectangle Nestabilies and then layered all the pieces with foam tape and glue for a more "real" look.  Added some 1/2 pearls to the centers of the flowers and some ribbon and bling to the box lid as well as a "tie down" made from buttons, embroidery thread and cloisonĂ© beads, and the box is done.  Buttons on the bottom of the box work as feet to keep the paper from wearing.


This box, along with a pair of earrings I put inside will be going to my oldest daughter on Monday.  I don't get to see her very often as we don't live in the same town and neither of us drive.  Her favorite color is Blue...I found this out at Easter...the last time I saw her, when I gave her a pair of my Tatted Earrings...in purple...lol  I was duely informed that I need to "keep up Mom"  lol   So, I hope this is enough Blue for her...lol

Friday, April 23, 2010

Circular "Lace" Tutorial

As requested, I have made a Tutorail for you on how I made the Circular Lace in my card Here.  Not much for me to "say" as the pictures say it all, so here is the Tut.  Hope you have fun!