I have a Craft Show coming up on February 18th and my card situation was looking pretty dismal. I decided I needed to make at least 50 new cards for the show...I did it! I actually made 57 new cards between Sunday, January 8 and today (January 13)...talk about tired now...lol
So it doesn't take so long to load, I've made all of the cards into a Slide Show. Hope you enjoy the show. Dont forget to tell me what you think too.
All but the FSS cards can be found on my page on CUP. The file name for each card is attached to the image, but if you need help finding one, just give a shout.

Showing posts with label Nestabilities. Show all posts
Showing posts with label Nestabilities. Show all posts
Friday, January 13, 2012


Tuesday, September 28, 2010
Long time no see!
Well, it has been a long time since I posted, but I'm still here! I've been off on a trip to NY State to visit a friend for a week...and OH what a GREAT time we had! Been having some health issues since I got back, but hopefully soon they will be over! Not done much in the way of design work, but I got an order for a card with a Truck, so instantly thought of the Truck from Fred She Said! I just LOVE this image!
 I printed the image out on some textured and speckled paper by Wasau called Stardust then cut it out with the Mega Curved Rectangle Nestabilities and soften the edge with Color Box Platinum ink. I layered it on one of my Walnut Inked Backing Paper 1, which I embossed with the Cuddlebug Script Embossing Folder then rubbed with metallic chalk and softened the edge with several brown inks from Color Box. This is then layered onto the card which is backed with a piece of crinkled and sanded Core'dinations Color Core Cardstock. All in all, a great card to give to an elderly gentleman.
Hopefully soon I will have the pictures from my trip edited (I took over 200 :-O ) and will be able to post some about it.

Hopefully soon I will have the pictures from my trip edited (I took over 200 :-O ) and will be able to post some about it.
Thursday, May 27, 2010
Busy week!
Wow! Last week was busy! I had my bestest friend come and stay with me for a whole week! She came in from Upstate New York and we had a total blast! I actually got a few cards made too. :-O We had fun showing each other new things/card techniqes. Here is one of the cards I made.


This Fred She Said image is Emma Blowing Her Bubbles Digi Stamp. I've colored Emma with Prismacolor color Pencils, then used Baby Oil in my version of the Gamsol Technique to blend them. I used Clear Finger Nail Polish over the Bubbles so they would "pop" (who needs expensive Scrpapbooking products! ;-)). Then I cut Emma out with the Nestabilities Labels 1 die, sponged the edges lightly with reconstituted Walnut Ink Crystals and then distressed the edges. Emma is then layered on two pieces of Card Stock that have been cut with my new Martha Stewart Punch Around the Page punch. Added a bit of ribbon and a bow, a peel-off sentiment and it finished, ready to send out.
Friday, May 21, 2010
Here Comes Summer! Blog Hop
Welcome to our "Here Comes Summer FRED SHE SAID" blog hop!!! If you just happened to drop by my blog and you are not aware of this wonderful event taking place, please go back to the Fred She Said blog and start your hop!
Please, we would love it if you commented on our posts.
Along the way, you will see a special CODE WORD. Collect them all up! Once you reach the end of the blog hop (which will be the Fred She Said Challenge blog), follow the instructions to make your entry and your name will go in for a draw for a $20 Gift Certificate for the Fred She Said Store!
Here is my Fred She Said creation:
My special code word is: SEASON
Here is a list of the blog hoppers in case you lose your way:
*FRED SHE SAID blog
*SONYA
*MARIA
*SHELLEY
*MICHELLE
*CAROL L. (You are here)
*DARSIE B.
*JUDY
*CAROL H.
*LORA
*DEANNE
*FRED SHE SAID CHALLENGE BLOG
This blog hop will run from today, MAY 21st until MAY 27. On the 28th, the winner will be announced on the Fred She Said blog.
Thank-you for taking the time to play along. Now, to continue the blog hop, please visit DARSIE B.
When you are finished hopping, why not check out the Fred She Said Store!
Please, we would love it if you commented on our posts.
Along the way, you will see a special CODE WORD. Collect them all up! Once you reach the end of the blog hop (which will be the Fred She Said Challenge blog), follow the instructions to make your entry and your name will go in for a draw for a $20 Gift Certificate for the Fred She Said Store!
Here is my Fred She Said creation:

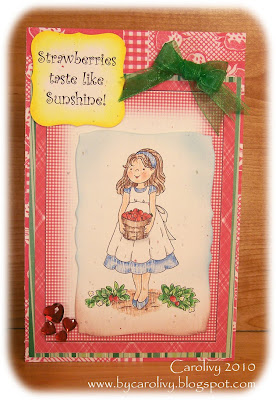
I used Emma in the Strawberry Patch by Fred She Said and colored her with Prismacolor Colored Pencils and cut out with the Nestabilities Mega Curved Rectangle Die. The Red Gingham paper is one of my card fronts available on CraftsUPrint here and the Strawberry paper is some scrapbook paper from my stash. I added a Computer Generated Sentiment that was cut out with the Nestabilities Labels 1 die and then inked around the edge. Some cute Heart Gems and a Double Organdy Bow finish off my card for this hop.
My special code word is: SEASON
Here is a list of the blog hoppers in case you lose your way:
*FRED SHE SAID blog
*SONYA
*MARIA
*SHELLEY
*MICHELLE
*CAROL L. (You are here)
*DARSIE B.
*JUDY
*CAROL H.
*LORA
*DEANNE
*FRED SHE SAID CHALLENGE BLOG
This blog hop will run from today, MAY 21st until MAY 27. On the 28th, the winner will be announced on the Fred She Said blog.
Thank-you for taking the time to play along. Now, to continue the blog hop, please visit DARSIE B.
When you are finished hopping, why not check out the Fred She Said Store!
Wednesday, May 12, 2010
Busy, Busy, Busy around here!
Well, it has sure been busy around my house the last couple days! I am having some work done on my house and they are working like gang busters! I can't believe how fast the work is going! I am having a roof put over most of my front deck (mostly to stop some water that is going into my basement, but I will LOVE the extra shade!) They are also going to be doing some other stuff to stop the leaking too, but this is the first step. Here are pictures of the work in progress so far.


I've been real busy myself, getting ready for a friend who is going to be visiting me next week for a whole week. We are going to have SO much fun when she gets here! We have a Craft Show that we will be doing together and then on another day we are going to do some SERIOUS retail therapy at Hobby Lobby, Joann's and the Bead Haven! I've been making up a bunch of cards too, getting ready for the show.
Here is one that I made up using Fred She Said's Emma in Her Frills for a lovely lady going through a terrible time right now. Her husband was in a terrible motorcycle accident. My prayers and wishes for a full recovery went out in the mail with this card.

I used Prismacolor Color Pencils to colro this one and then dry blended most of it. I cut Emma out with the Nestabilities Labels 4 die, then inked the edges while it was still in the die. The paper behind Emma is cut with the same die and is actually a piece of white embossed paper that I completely rubbed over with ink. Th edge of the green card has been punched with a Martha Stewart Edge Punch and layered on the card blank which has been cut on the edge with a Deckle Blade and then inked with 2 shades of purple. I then used Aleene's Tack-it Over & Over inside the cutouts and added glitter. The sentiment is done the same way with the inks. A beautiful organdy bow, peel-off corners and lots of bling finish of this card.
Tuesday, May 4, 2010
Man's Birthday Card with Rosey
I have an order for several Birthday Cards and when the lady told me that one of the Guy's she needed a card for, I immediately thought of Rosey by Fred She Said! Rosey comes Pre-colored, so all I did was cut her out with the Nestabilities Labels 3 die and layer her on a very large paint sample that I rounded the corners on and a piece of DP that I rounded the corners on and then punched each end with the Martha Stewart edging punch. All layered on top of a "leather" look piece of scrapbook paper and finished off with some gold peel-offs. (Hope she likes it as "Men's" cards are SO hard for me to think of!....next ones I have to figure out are for a Blind Man and a Blind Woman! :-O Watch out for the TEXTURE on those! lol)
.jpg)
.jpg)
Monday, April 26, 2010
Y'all Ready for Another Challenge?
Yup, it is that time of month again at Fred She Said!
This month's Challenge is to Make Something 3-D for a Loved One. Just remember though, that you MUST use a Fred She Said image Somewhere on the card for it it qualify in the Challenge! If you don't have one, not to worry! There are PLENTY of Freebies here! Come and Play with us for the chance to win a $20 Gift Certificate at the Fred She Said Store! Enter your project on Mr. Linkey in this month's Challenge post on the Fred She Said Challenge Blog. Don't have a Blog? Not to worry. You can still entere! Follow the directions for emailing a picture of your entry to Tracey.
Now, on to my project for today!
I have chosen to use an old Crayola Box and do a bit of Alteration to it. I have used paper from a "petite fleurs" patterned paper that Tracey designed and it can be found here as a FREEBIE. It took me 5 sheets to fully cover the box. I then took a 5 x 7" Photo Mat and covered it with Gold Vellum and mounted it on the box lid with foam tape. Then came the flowers from the Lovely Blossom & Butterfly Coloured Decoupage Kit (I used the blue set to follow the Blue Theme I have going here) I cut the main image out with the Mega Curved Rectangle Nestabilies and then layered all the pieces with foam tape and glue for a more "real" look. Added some 1/2 pearls to the centers of the flowers and some ribbon and bling to the box lid as well as a "tie down" made from buttons, embroidery thread and cloisoné beads, and the box is done. Buttons on the bottom of the box work as feet to keep the paper from wearing.


This box, along with a pair of earrings I put inside will be going to my oldest daughter on Monday. I don't get to see her very often as we don't live in the same town and neither of us drive. Her favorite color is Blue...I found this out at Easter...the last time I saw her, when I gave her a pair of my Tatted Earrings...in purple...lol I was duely informed that I need to "keep up Mom" lol So, I hope this is enough Blue for her...lol
This month's Challenge is to Make Something 3-D for a Loved One. Just remember though, that you MUST use a Fred She Said image Somewhere on the card for it it qualify in the Challenge! If you don't have one, not to worry! There are PLENTY of Freebies here! Come and Play with us for the chance to win a $20 Gift Certificate at the Fred She Said Store! Enter your project on Mr. Linkey in this month's Challenge post on the Fred She Said Challenge Blog. Don't have a Blog? Not to worry. You can still entere! Follow the directions for emailing a picture of your entry to Tracey.
Now, on to my project for today!
I have chosen to use an old Crayola Box and do a bit of Alteration to it. I have used paper from a "petite fleurs" patterned paper that Tracey designed and it can be found here as a FREEBIE. It took me 5 sheets to fully cover the box. I then took a 5 x 7" Photo Mat and covered it with Gold Vellum and mounted it on the box lid with foam tape. Then came the flowers from the Lovely Blossom & Butterfly Coloured Decoupage Kit (I used the blue set to follow the Blue Theme I have going here) I cut the main image out with the Mega Curved Rectangle Nestabilies and then layered all the pieces with foam tape and glue for a more "real" look. Added some 1/2 pearls to the centers of the flowers and some ribbon and bling to the box lid as well as a "tie down" made from buttons, embroidery thread and cloisoné beads, and the box is done. Buttons on the bottom of the box work as feet to keep the paper from wearing.


Thursday, April 15, 2010
Our 4th Fred She Said Blog Hop....come and join the fun!
Welcome to our FOURTH Fred She Said blog hop!!! If you just happened to drop by my blog and you are not aware of this wonderful event taking place, please go back to the Fred She Said blog and start your hop!
No Special Code words this time...This time, you must comment on everyone's blog in the hop, then follow the instructions at the end of the blog hop, at the Challenge blog, to make your entry and your name will go in for a draw for a $20 Gift Certificate for the Fred She Said Store!
Here are my Fred She Said creations for this Hop. Something "Old" and something "New"
For the "Old", I have used the Fred's Flowersv3 - Blue Blossoms Kit. I used Photoshop to make the outside "frame" really dimensional without having to do any actual physical layering with the paper. The Blue Round Frame is cut with the Nestabilites dies and the "lace" (both green and black) is cut using the Martha Stewart edging punch, trimming it to curve around the outside of the circle for the black and trimming off just the top "rick-rack" for the green. The small white flowers are made with a small punch that I have and small pearls. I added a few bits of "fern" punched with another Martha Stewart punch under the flowers and some 1/2 pearls to the flowers to finish them.

And, for a bit of a "play" on designs here.....For the "New" card, I used an image that is just being released today called The Old Truck. I have used the Rusty Red version. It also comes in a Red, Brown, Blue and Un-colored versions. I cut the image out with the Mega Rectangle Nestabilities Die and then distressed the edge. Layered on Watercolor paper that has been spritzed with Walnut Ink and Salt. Some Buttons, Ribbon a Tatted Flower and a paper flower all work to finish off this card.

Here is a list of the blog hoppers in case you lose your way:
FRED SHE SAID blog
~SHELLY
~MICHELLE
~CAROL L. (You are Here)
~DARSIE B.
~JUDY
~CAROL H.
~LORA
~SONYA
~DEANNE
~FRED SHE SAID CHALLENGE BLOG
This blog hop will run from today, April 15th until April 22nd . On the 22nd, the winner will be announced on the Fred She Said blog .
Thank-you for taking the time to play along. Now, to continue the blog hop, please visit DARSIE B.
When you are finished hopping, why not check out the Fred She Said Store!
AND, if you haven't stopped by the Fred She Said Challenge Blog and played along with us this month, there is STILL time to join in on the fun! Come on over and have some fun! Spring is Here!
No Special Code words this time...This time, you must comment on everyone's blog in the hop, then follow the instructions at the end of the blog hop, at the Challenge blog, to make your entry and your name will go in for a draw for a $20 Gift Certificate for the Fred She Said Store!
Here are my Fred She Said creations for this Hop. Something "Old" and something "New"
For the "Old", I have used the Fred's Flowersv3 - Blue Blossoms Kit. I used Photoshop to make the outside "frame" really dimensional without having to do any actual physical layering with the paper. The Blue Round Frame is cut with the Nestabilites dies and the "lace" (both green and black) is cut using the Martha Stewart edging punch, trimming it to curve around the outside of the circle for the black and trimming off just the top "rick-rack" for the green. The small white flowers are made with a small punch that I have and small pearls. I added a few bits of "fern" punched with another Martha Stewart punch under the flowers and some 1/2 pearls to the flowers to finish them.

And, for a bit of a "play" on designs here.....For the "New" card, I used an image that is just being released today called The Old Truck. I have used the Rusty Red version. It also comes in a Red, Brown, Blue and Un-colored versions. I cut the image out with the Mega Rectangle Nestabilities Die and then distressed the edge. Layered on Watercolor paper that has been spritzed with Walnut Ink and Salt. Some Buttons, Ribbon a Tatted Flower and a paper flower all work to finish off this card.

Here is a list of the blog hoppers in case you lose your way:
FRED SHE SAID blog
~SHELLY
~MICHELLE
~CAROL L. (You are Here)
~DARSIE B.
~JUDY
~CAROL H.
~LORA
~SONYA
~DEANNE
~FRED SHE SAID CHALLENGE BLOG
This blog hop will run from today, April 15th until April 22nd . On the 22nd, the winner will be announced on the Fred She Said blog .
Thank-you for taking the time to play along. Now, to continue the blog hop, please visit DARSIE B.
When you are finished hopping, why not check out the Fred She Said Store!
AND, if you haven't stopped by the Fred She Said Challenge Blog and played along with us this month, there is STILL time to join in on the fun! Come on over and have some fun! Spring is Here!
Thursday, April 8, 2010
Spring is Really Here! Yeah!
I'm getting a bit of a slow start going this month. Sorry about that...sigh.
I am still in Spring Mode, even though the Weatherman is calling for some of the OTHER nasty 4 letter word over the next few days! :-O Doesn't he know that it is April and that it is April SHOWERS that bring May Flowers, not that other stuff? lol
Today's card is made using Spring Flowers with Bonus PP Frame by Fred She Said. The Blue and Yellow papers it is matted on are some sampled of Hand Made Papers that I have. All the shapes were cut with the Nestabilities Labels 1 die.
I know some people have said they have problems with getting the Paper Pricking and the image centered right, so I thought I'd share with you a little "trick" I have discovered. Now, this ONLY works if you are doing Paper Pricking, not Stitching. It makes the holes larger, which you do not want for Stitching! If your Paper Pricking pattern is printed out on the Front side, don't worry about it...there is a way to make that work for you without a total headache! Go ahead and Prick the pattern, from Front to Back. You don't have to prick the pattern all the way through, just make sure that you "break" the paper with your tool. After you have done the whole pattern, turn the piece over and use a Spoon or other smooth tool and Flatten all the little holes back up. (yes, really!) Now, with your work still facing Down, Prick the pattern again...this time fully! Go ahead and peek...you will see that all the little ridges are now in the Front! Might take you twice as long to prick it, but Oh, the headache you save yourself trying to center something from the back!
Ok, now on to the coloring of my card....
I cut out an extra frame so I had a Mask and then used Sky Blue on the inside around the Daffodil. Added just a touch of Heliotrope to just the corners. Then I used Lime and Green on the outside portion, highlighing the pricking on this section with the Green. All the inks used were Color Box Inks. I used some Metallic Chalks (verrrry old...sorry, no longer available) to highlight the pricking on the inside, then went around the frame with a Gold Marker. The Daffodill is then colored with Prismacolor Color Pencils and Dry Blended. This is then layered on the card with some foam pads for more dimension. Peel-offs and some 1/2 pearls added to the corners of the inside frame and the peel-offs finish of this card.
.jpg)
Here is a Closeup of the Detail on the Paper Pricking.
-closeup.jpg)
I am still in Spring Mode, even though the Weatherman is calling for some of the OTHER nasty 4 letter word over the next few days! :-O Doesn't he know that it is April and that it is April SHOWERS that bring May Flowers, not that other stuff? lol
Today's card is made using Spring Flowers with Bonus PP Frame by Fred She Said. The Blue and Yellow papers it is matted on are some sampled of Hand Made Papers that I have. All the shapes were cut with the Nestabilities Labels 1 die.
I know some people have said they have problems with getting the Paper Pricking and the image centered right, so I thought I'd share with you a little "trick" I have discovered. Now, this ONLY works if you are doing Paper Pricking, not Stitching. It makes the holes larger, which you do not want for Stitching! If your Paper Pricking pattern is printed out on the Front side, don't worry about it...there is a way to make that work for you without a total headache! Go ahead and Prick the pattern, from Front to Back. You don't have to prick the pattern all the way through, just make sure that you "break" the paper with your tool. After you have done the whole pattern, turn the piece over and use a Spoon or other smooth tool and Flatten all the little holes back up. (yes, really!) Now, with your work still facing Down, Prick the pattern again...this time fully! Go ahead and peek...you will see that all the little ridges are now in the Front! Might take you twice as long to prick it, but Oh, the headache you save yourself trying to center something from the back!
Ok, now on to the coloring of my card....
I cut out an extra frame so I had a Mask and then used Sky Blue on the inside around the Daffodil. Added just a touch of Heliotrope to just the corners. Then I used Lime and Green on the outside portion, highlighing the pricking on this section with the Green. All the inks used were Color Box Inks. I used some Metallic Chalks (verrrry old...sorry, no longer available) to highlight the pricking on the inside, then went around the frame with a Gold Marker. The Daffodill is then colored with Prismacolor Color Pencils and Dry Blended. This is then layered on the card with some foam pads for more dimension. Peel-offs and some 1/2 pearls added to the corners of the inside frame and the peel-offs finish of this card.
.jpg)
Here is a Closeup of the Detail on the Paper Pricking.
-closeup.jpg)
Monday, March 29, 2010
Are you ready for Another Challenge?
We are doing another Challenge over at the Fred She Said Challenge Blog. In March we leave Old Man Winter behind so let's create a VERY SPRING-Y project, loaded with all those lovely pastel colors! Just remember though, that you MUST use a Fred She Said image Somewhere on the card for it it qualify in the Challenge! If you don't have one, not to worry! There are PLENTY of Freebies here! Come and Play with us for the chance to win a $20 Gift Certificate at the Fred She Said Store!
Now, on to my cards today!
First up is one I made using the Bouquet of Tulips (New Release)


Now, on to my cards today!
First up is one I made using the Bouquet of Tulips (New Release)

The image is printe out on regular cardstock and colored with Prismacolor Colored Pencils and Dry Blended, then cut out with the Nestabilities Mega Curved Rectangle die and brushed with Lime Green Color Box Ink and layered over 2 more Nestie shapes cut from Scrapbook paper. The card backing is made from Textured White Core Cardstock run throught the D'Vine Swirls Cuddlebug Embossing folder twice, then sanded with an emery board to bring out the White Core. A bit of ribbon put on before adhering to the card blank. The top 2 Nestie shapes are layered with foam tape to add more dimension to the card. Some gold peel-offs and a bow finishe off this card.
My second card is made using the Purple Corner Rose (another New Release)

This card is done on a base of some very pale purple Scrapbook paper. I cut the Purple Corner Rose out with the Nestabilities Labels 1 die, then edged the white areas with Heliortope Color Box Inks. The rest of the rose is then cut out and 3-D'd over the top of the main image. The Top Rose has been spritzed with Glimmer Mist before being layered on the card. The Center Panel on the card is made from a piece of textured white cardstock cut on both sides with the Martha Stewart Doily Edge Punch, then brushed with first Lavender Color Box Inks, then Grape Jelly Memento Ink. I then took 6 strands of DMC Light Effects Embroidery Floss (#E211-Lilac) and did a Running Stitch in the smaller holes of the punched edges. A piece of pale purple organdy ribbon was placed along the center before putting it on the card. A bow from the same ribbon and some gems finish the center panel. I layered this onto the card with foam tape, then layered the Corner Rose over that with more foam tape. A Silver Peel-off Sentiment finishes off the card sweetly.
Wednesday, March 17, 2010
Another Spring Card
The weather here is still super gorgeous and I am still making Spring Cards...lol I know that we are going to be needing some rain soon, but I am really liking the nice blue skies and warm temperatures we are experiencing right now! I can finally open my doors and windows to let out all of the old "Winter" air and let in some nice fresh Sprng air! Ahhh!
Today's card is another from Fred She Said. This one is the Carnation that I specially asked Tracey to make when she was drawing all of her Gorgeous Flower Digi's. The Carnation is my favorite flower. ;-) The Carnation and all the other Favorite Flowers can be found here.

Today's card is another from Fred She Said. This one is the Carnation that I specially asked Tracey to make when she was drawing all of her Gorgeous Flower Digi's. The Carnation is my favorite flower. ;-) The Carnation and all the other Favorite Flowers can be found here.

Today's card is made on Green Mirri Board with a panel of textured Pink CS run through a Cuddlebug Embosing folder, Perfect Pearls and then a bit of Oil Pastels added for enhancement. The Tea Bag Medallion is the Saw Blade Fold, Variation 3 from Rosa Clarke and the tile is by Marie B. To color the Carnation, I used Prismacolor Colored Pencils and then Dry Blended them. I used a new inkpad from Ancient Page in Pink Pizzazz around the edge of the Carnation which has been cut out with the Nestabilities Labels 4. The peel-offs have been colored with Sharpies and the ribbon and gems are from my stash.
I hope you are all beginning to see the signs of Spring as well as I am!
Be sure to watch next week, as we have another Blog Hop coming up, which means some more awesome NEW designs from Tracey! :->
Monday, March 8, 2010
Cards made with Free Operation Write Home FSS Digi Stamp
Operation Write Home is a network of cardmakers who create blank handmade greeting cards in support of our nation's heroes for them to write home on. Operation Write Home recently started a new blog, Stars and Stamps, to inspire the many cardmakers. The Stars and Stamps blog features inspiration, challenge, tutorials, creativity and more! Operation Write Home is currently hosting a Half and Half challenge to inspire us cardmakers to create Mother's and Father's Day cards. Fred She Said Designs is offering a free Tulips digital stamp for Mother's Day and FSS DT Darsie Bruno has a wonderful tutorial planned using this freebie Tuesday March 9th on the Stars and Stamps Blog, Please check it out and, also, the latest Half & Half Operation Write Home Campaign :)
Here are are 2 cards that I have made using the Free Tulips Digistamp.


Here are are 2 cards that I have made using the Free Tulips Digistamp.
Both images are printed on Watercolor paper which was spritzed with Interferance Red Perfect Pearls mixed with water BEFORE printing.
The first card, I was aiming for a bit of a Vintage look. The Tulips are cut out with the Nestabilities Labels 4 dies, colored with Prismacolor Colored Pencils and Dry Blended. Then the image has been distressed. The panel behind it is Core'dnations Color Core Cardstock, Black Magic. This has been cut with the Nestabilites Mega Deckled Rectangle, then embossed with a CB folder, then sanded with an emery board. The card blank for this card was printed out using Photoshop to give it a "Waterstained" look, cut with a Deckle Edge Rotary Paper Trimmer. The pink along the edge is actually along the inside of the card. A bit of ribbon and some 1/2 pearls finish off this card.

This second card, the Tulips were colored using Water Color paints and Perfect Pearls on top of that for a bit of shimmer. The Green paper behind the Tulips is some Scrapbook paper that has been spritzed with Shimmering Mist. These layers are layered on the card with foam tape. The large yellow "ribbon" panel behind the Tulip is cut with a Martha Stewart Edge Punch. The backing paper on this card is some very old Hand Made Paper that has seen better days, but I thought it worked really well with this image. Some ribbon, a few gems and some peel-offs finishe off this card for a nice Spring "feeling" card.

Monday, March 1, 2010
Oh, I'm Thinkin' Spring!
Can you tell? I'm really starting to think Spring! It got up to 48° F here yesterday and I SO wanted to throw open the doors and windows! lol Well, I resisted, but just barely...

Oh and if you haven't entered the Challenge over at the Fred She Said Challenge Blog, you still have time! Why not give it a look and come play with us...you have a chance to win a $20 Gift Certificate at the Fred She Said Store! Woohoo!

Today's card is made using one of Fred She Said's very cute images called FSS- Bunneh! - Easter Bunny Digital Stamp and one of her many flowers (can't tell you which one...oops...cuz it is a leftover from a sheet I printed a LONG time ago). Bunneh is colored with Prismacolor Colored Pencils and Dry Blended. and the Flower is done with Crayola Markers...my very first project with these and I really like how vibrant it came out! After it was all colored, I spritzed it with a bit of Glimmer Mist (hard to see in the photo, but it really is shimmery!) The flower is part of a project I am in the process of doing thanks to Shelly's Spotlight over at Fred She Said last week! Have you checked it out yet? If you haven't you really should! Shelly used a whole sheet of flowers and made it as a gift, but I am using up all the partial sheets of flowers and other things and making up a box of Quick to Make Card Stuff (just putting it all in an old puzzle box for safe keeping ;-) )
The embossing on this card is from a Cuddlebug folder and it is my first (successful) use of the stamp pad that comes with the Perfect Pearls (Thank You Tracey for the tip! ;-) ) I shaved a bit of green chalk onto a ceramic tile and added some of the Perfect Pearl Green Interferance into that and mixed it up good and used that on the leaves so it is more visible and not just glittery and shimmery. Worked pretty good. I saved the leftovers too. ;-) The sentiment is computer generated and cut out using the Spellbinders Nestabilities Label 1 die as is Bunneh. A bit of ribbon and some 1/2 pearls finish off this card.Oh and if you haven't entered the Challenge over at the Fred She Said Challenge Blog, you still have time! Why not give it a look and come play with us...you have a chance to win a $20 Gift Certificate at the Fred She Said Store! Woohoo!
Monday, February 22, 2010
February's FSS Blog Challenge
Are you all ready for the February Fred She Said Challenge Blog Challenge? Well, if you are, here is this month's theme. Since this is the month of LOVE, create something with at least 3 hearts on it. Be sure to use a Fred She Said image somewhere on your card! If you don't have one, there are LOADS of freebies available HERE!
This Challenge runs from Today, February 22, unitl March 28th, so be sure to play with us for a chance to win! What can you win? A $20 Gift Certificate to the Fred She Said Store! How cool is that!
To enter your card, just be sure to follow the directions on the Challenge Blog. You don't even have to have your own Blog to enter! :->
Now, here is MY card!

For this card I used the Christmas Rose Coloured & Digi Sets which has been layered with foam tape and count them ladies, 15 hearts, yes 15! 9 of them are cut with the Spellbinder Nestabilities Heart Die that my Good Friend Marie B gifted me...I still have a few left to play with. ;-) I colored the edges of each color set of hearts with the same color of Color Box inks, then ran them through the same Cuddlebug Embossing Folder for a bit of "punch", then layered them on the card with foam tape.
Now that you've seen MY Heart creation with a Fred She Said image, I want to see what YOU can do! Go have FUN! I can't wait to see all the pretties that are made this month!
Thursday, February 11, 2010
Valentine Napkin Card
Oh wow! I was digging through my craft goodies and I found this absolutely gorgeous Valentine Napkin! I just had to make a card with it! Well, actually, I only used 1/4 of the napkin. I have enough napkin left to make 3 more cards! :-> I started out by peeling the napkin so that I just had one layer (the colored part), then I used Freezer Paper and ironed the napkin to the shiny part of the freezer paper (colored side up)....make sure you don't touch your iron to the shiny part of the paper...it is plastic and will make a mess out of your iron! After I had my whole napkin done (I did the whole thing because it is ALL pretty and the freezer paper is big enough to cover the whole napkin) I trimmed it to 1/4 so I could make 1 card. Then I cut out each of the hearts with the Spellbinders Nestabilities Label 1 and mounted it onto card stock cut out with the same die. Before I mounted them on the card stock backers though, I spritzed them with Glimmer Mist though for a bit of pizazz! I layered them on the card with foam tape and added dome sticker hearts that I just happened to have in exactly the same colors to finish off the card. 
 Here is a close up of the Glimmer Mist...isn't it Gorgeous?!

 Here is a close up of the Glimmer Mist...isn't it Gorgeous?!
Wednesday, February 3, 2010
Emma in Her Frills with a TB medallion
As a Challenge card on Circle of Crafters in the Tea Bag Room, I decided to use one of the tiles I printed out recently from the new set I made for Valentine's Day (available on CUP), but I didn't need another Valentine's card, so I made this a Thinking of You card. The fold is the Funky Star by one of the ladies from the Circle of Crafters. I used one of Fred She Said's Emma images. This one is Emma with Her Frills On - Digi. I cut her out with the Mega Curved Rectangle Nestabilities and used my Color Box ink pads to color the edges. I colored Emma with Prismacolor color pencils and blended her with Baby Oil with my version of the Gamsol Technique. Emma's frills are glittered with Aleene's Tack-it Over and Over and Glamour Dust. The sentiment is done with a CB die. The ferns are some that were given to me in a RAK. The little white flowers I made with 2 little punches I have and a pearl in the center.

Saturday, January 30, 2010
Nestabilies Storage Idea
Thanks to one of the ladies from Circle of Crafters, I now have a new way of storing my Spellbinder Nestabilities Dies! Her idea was to use the inside of Cupboad Doors, but I don't have any cupboards in my Craft Area. I do however, have a large shelf storage area that has one area that I leave open where I take all of my photos. I have now covered part of the area above the photo area with magnetic sheets and that is where I will be storing my Nesties. I have plenty more room there to expand...and I have more Nesties ordered too....lol

Thursday, January 28, 2010
More Chocolate from Fred She Said!
 Here is another card I made using the Valentine's Day - Better Than Chocolate Digi & Coloured Set from Fred She Said today. I used Prismacolor color pencils to color it and Baby Oils to blend it in my version of the Gamsol Technique. Before I did that though, I masked off the Digi Stamp and flicked on Red, Pink and White Pearl Acrylic Paints for a really shimmery background. The Tea Bag Medallion is done with the Radiant Star fold and a new tile that I have designed that is available in a set called Valentine Paisley Tile & Backers Set 2 from Craftsuprint. The Pink Metallic paper is from a pack of paper from American Crafts Specialty Papers and both that and the Digi Stamp are cut with the Spellbinders Nestabilities Mega Curved Rectangle Die. The ribbon is from my stash.
I have attached a close up so hopefully you can see how shimmery the background is with the acrylic paints.
Here is the fold sheet of the fold used on this card. Just click on it to bring it up full.
Wednesday, January 27, 2010
A Combination of Techniques
 For this card, I have used an image by Fred She Said called Emma with Her Frills On - Digi . Emma is colored with both Prismacolor Watercolor Pencils as well as Prismacolor Pencils and Dry Blended. I used the regular pencils on Emma's face, hands and feet as I don't have a "skin tone" pencil I like in my Watercolor set.
Papers used are a purple textured metallic paper that I picked up at Walmart as well as a Purple Mirri Board, both have been cut with the Spellbinders Nestabilities Large Labels die. The whole thing is mounted on Textured White Cardstock.
Martha Stewart Deep Edge Punch was used on the metallic purple cardstock and the Martha Stewart Lattice Punch was used on a bit of green cardstock for the "grass" under Emma's feet.

Here is a closer look at Emma. She has Bling flowers with Peel-off waste used to make a Bow and Ribbons for her bouquet. The lace on Emma's dress has also been "blinged" with Aleene's Tack-it Over and Over and Glamour Dust.
For those interested in Tea Bag Folding, the medallion on my card is done using the Variation of Carol's Crazy Zig-Zag Fold and a tile by my good friend Marie B. I have included the fold directions for those who would like to try their hand at folding....more of my Tea Bag directions to follow in future posts, so keep your eyes peeled. ;-) (just click on the directions to bring them up full screen.)

Saturday, January 16, 2010
Hurry Up Spring! lol
In my desire to see the end of snow, I have been working on Spring cards! Here is my latest Spring card.
I have used an image from Fred She Said called FSS- Bunneh! - Easter Bunny Digital Stamp. I have done my coloring with Prismacolor Watercolor Pencils and added just a touch of Aleene's Tack-it Over and Over to the spots on the Eggs and some Glamour Dust. I cut out the Bunneh with the Spellbinders Nestabilities Large Labels. The paper behind Bunneh is some Lime Green Mirri Board. The punch along the edge is one of Martha Stewart's Deep Edge punches, the Buttons along the bottom are a Cuttlebug Embossing folder and inked with Color Box ink in Lime Green. I have edged the Bunneh and the edging strip as well as the sentiment tag with marker (see my Tutorial here). A bit of Bling and a Double Bow and the card is finished.
Here is a close-up of the Bunneh, so hopefully, you can see where I have put the Glamour Dust on the eggs.
If you haven't checked out the Blog Hop that is going on RIGHT NOW, be sure to check out this post for a chance to win some great prizes!

I have used an image from Fred She Said called FSS- Bunneh! - Easter Bunny Digital Stamp. I have done my coloring with Prismacolor Watercolor Pencils and added just a touch of Aleene's Tack-it Over and Over to the spots on the Eggs and some Glamour Dust. I cut out the Bunneh with the Spellbinders Nestabilities Large Labels. The paper behind Bunneh is some Lime Green Mirri Board. The punch along the edge is one of Martha Stewart's Deep Edge punches, the Buttons along the bottom are a Cuttlebug Embossing folder and inked with Color Box ink in Lime Green. I have edged the Bunneh and the edging strip as well as the sentiment tag with marker (see my Tutorial here). A bit of Bling and a Double Bow and the card is finished.

Here is a close-up of the Bunneh, so hopefully, you can see where I have put the Glamour Dust on the eggs.
If you haven't checked out the Blog Hop that is going on RIGHT NOW, be sure to check out this post for a chance to win some great prizes!
Subscribe to:
Posts (Atom)